
First things first, we need to build our circuit. This is the easy bit! We’ll be using theArduino to control a servo that will rotate our sensor around 180 degrees. The Arduino will then send the value from the distance sensor along with the current angle of the servo to the serial port.
Before proceeding please take a moment to check out some of my other work with the SRF-05 and servos if you’re unfamiliar with either.
Arduino SRF-05 Tutorials
Arduino Servo Tutorials
Arduino SRF-05 Tutorials
Arduino Servo Tutorials
I’m building this with the SRF-05 ultrasonic range finder/ distance sensor, but because this has a fairly wide field of detection it’s not very precise – I think I’ll end up trying a different range finder maybe an IR one as the SRF-05 works best as a static sensor/ detector, anyway…
Arduino Radar Parts list
SRF05 Ultrasonic range finder
Arduino Deumilanove w/ ATMEGA328
Breadboard / Prototyping board
Jumper/ Connector wires
1x Servo (has to need no more than 5v supply)
You’ll also need some way to mount the sensor to the servo.
Arduino Deumilanove w/ ATMEGA328
Breadboard / Prototyping board
Jumper/ Connector wires
1x Servo (has to need no more than 5v supply)
You’ll also need some way to mount the sensor to the servo.
Arduino Radar Servo Circuit
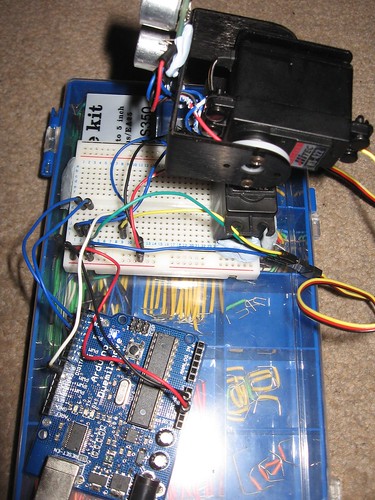
Straight forward, we have the Arduino providing power to the breadboard and we have the servo and the SRF-05 sharing this power. Then we have the servo output pin going to Arduino digital pin 9 and the SRF-05 pins going to digital pin 2 and 3. You’ll notice that in my pictures I have 2 servos – I’m just using the bottom one of the pair to rotate the sensor round. On your servo you’ll need to figure out a way to mount the sensor on to the servo wheel – I used a lot of blu-tac! You’ll also see I’ve mounted my sensor vertically so that the when the servo moves there’ll be less interference with recieving values – placing the sensor horisontally seemed to give differences of up to and sometimes over 5cm between the first and second readings.
My servos do tend to move a bit so I’ve used more blu-tak/ modelling clay to hold them down and in place – if the servos move other than the way they’re meant to then it means dodgy readings.

Arduino SRF05 Radar Sketch
The hardest bit – rotate the servo from left to right, then right to left and for every degree of movement take a series of readings and send them to the serial port. We’ll want to produce an average reading value for consistancy. Unfortunately with this ultrasound sensor we have to be quite slow to make sure we’re getting accurate values and we have to allow time for the signal to come back each time and register in order to produce the average value.
We do the rotation using a for loop to count to 180 and for each iteration we move the servo by +1 or -1 depending on which way we’re going – if you’ve hacked your servos then you can do a full 360 loop. During this loop we do another FOR loop to count to 10/ numReadings and for each iteration we add the distance measured to the total and after 10 readings we get our average by dividing the total by the number of readings. Then reset the total and the counter to start again for the next servo position. Finally before finishing the the FOR loop for the servo we output the servo position and average reading to the serial port each with a preceeding character for us to later use to identify the values when reading the serial port in Processing. The last line is using println which will start a new line for the next set of values – each reading has its own line in the serial buffer makign it much easier to get our values back out.


This is where all the work is done to read an interpret the values from the servo and the sensor. If the readings are to erratic then you won’t have nice shapes. Also if you don’t allow enough time to the signals to be sent back then you’ll get false distance readings. So this code is only as good as your Arduino code and sensor setup.
Took me a few evenings to work this out to get it how I wanted, the hardest bit is the trigonometry involved which isn’t that difficult, everything else is done by loops and a few IF statements. I use the FOR loops alot because the all the elements can be displayed programmatically without having to write each rectangle, cirle and line to the screen with their own statement.
If you’re not familiar with Processing then head over to Processing.org. Processing is a tool/ IDE that lets you program and code graphics and animation, it’s free to use and pretty powerful – best part is it works hand in hand with Arduino in the same C/C++ style of code, letting us take data from Arduino and whatever’s plugged into it and then visualise it on screen, e.g. like a radar screen.
First we have to setup our variables, background and load in the serial port libraries to ensure we can read the data sent by the Arduino. We also have to include a function from the serial library called serialEvent() which listens for data being sent and allows us to read the data easily. We do some easy string work, splitting the serial port lines to get the servo position and sensor value.
Also we can setup the radar screen, drawing the text, measurements and display grid. With processing whats nearest the top of the draw() function is displayed first with everything subsequentally drawn on top of this. So our lines and text will be at the bottom of the function so it will always be visible. To draw the lines and measurements we use a FOR loop. The draw() function draws one frame, so we basically re-draw the frame 180 times – we use a couple of arrays to store the previous values to make it look continuous.
Now that we have those we can then begin to display the values on our screen. We use a FOR loop to loop through each item in our array, newValue and oldValue. These are setup to hold 181 items – 1 item per servo position with 1 extra just in case, we loop through these to constantly display the previous readings – if we were to use the servo position itself to iterate through the array then no previous data would be displayed since the servo position is always changing.
Thoughout we need to calculate the X and Y co-ordinates of each servo position and sensor distance reading. To get these values we use trigonometry using sine and cosine and converting the servo position to a radian using the sensor reading as the distance from the center from which to draw the point. To learn more about this and to save me writing it up check out this tutorial at Processing.org.
The Sketch
Below is the code used to create the radar screen, it has comments to help explain. Everything used is an in built function of the Processing language and you can find the reference for the functions that I use in the reference section on the Processing.org website. So methods such as fill(), stroke(), rect(), line() etc…
Below is the code used to create the radar screen, it has comments to help explain. Everything used is an in built function of the Processing language and you can find the reference for the functions that I use in the reference section on the Processing.org website. So methods such as fill(), stroke(), rect(), line() etc…
/*
luckylarry.co.uk
Radar Screen Visualisation for SRF-05
Maps out an area of what the SRF-05 sees from a top down view.
Takes and displays 2 readings, one left to right and one right to left.
Displays an average of the 2 readings
Displays motion alert if there is a large difference between the 2 values.
*/
import processing.serial.*;     // import serial library
Serial myPort;                  // declare a serial port
float x, y;                       // variable to store x and y co-ordinates for vertices
int radius = 350;               // set the radius of objects
int w = 300;                    // set an arbitary width value
int degree = 0;                 // servo position in degrees
int value = 0;                  // value from sensor
int motion = 0;                 // value to store which way the servo is panning
int[] newValue = new int[181];  // create an array to store each new sensor value for each servo position
int[] oldValue = new int[181];  // create an array to store the previous values.
PFont myFont;                   // setup fonts in Processing
int radarDist = 0;              // set value to configure Radar distance labels
int firstRun = 0;               // value to ignore triggering motion on the first 2 servo sweeps

/* create background and serial buffer */
void setup(){
  // setup the background size, colour and font.
  size(750, 450);
  background (0); // 0 = black
  myFont = createFont("verdana", 12);
  textFont(myFont);
  // setup the serial port and buffer
  myPort = new Serial(this, Serial.list()[1], 9600);
  myPort.bufferUntil('n');
}

/* draw the screen */
void draw(){
  fill(0);                              // set the following shapes to be black
  noStroke();                           // set the following shapes to have no outline
  ellipse(radius, radius, 750, 750);    // draw a circle with a width/ height = 750 with its center position (x and y) set by the radius
  rectMode(CENTER);                     // set the following rectangle to be drawn around its center
  rect(350,402,800,100);                // draw rectangle (x, y, width, height)
  if (degree >= 179) {                  // if at the far right then set motion = 1/ true we're about to go right to left
    motion = 1;                         // this changes the animation to run right to left
  }
  if (degree <= 1) {                    // if servo at 0 degrees then we're about to go left to right
    motion = 0;                         // this sets the animation to run left to right
  }
  /* setup the radar sweep */
  /*
  We use trigonmetry to create points around a circle.
  So the radius plus the cosine of the servo position converted to radians
  Since radians 0 start at 90 degrees we add 180 to make it start from the left
  Adding +1 (i) each time through the loops to move 1 degree matching the one degree of servo movement
  cos is for the x left to right value and sin calculates the y value
  since its a circle we plot our lines and vertices around the start point for everything will always be the center.
  */
  strokeWeight(7);                      // set the thickness of the lines
  if (motion == 0) {                    // if going left to right
    for (int i = 0; i <= 20; i++) {     // draw 20 lines with fading colour each 1 degree further round than the last
      stroke(0, (10*i), 0);             // set the stroke colour (Red, Green, Blue) base it on the the value of i
      line(radius, radius, radius + cos(radians(degree+(180+i)))*w, radius + sin(radians(degree+(180+i)))*w); // line(start x, start y, end x, end y)
    }
  } else {                              // if going right to left
    for (int i = 20; i >= 0; i--) {     // draw 20 lines with fading colour
      stroke(0,200-(10*i), 0);          // using standard RGB values, each between 0 and 255
      line(radius, radius, radius + cos(radians(degree+(180+i)))*w, radius + sin(radians(degree+(180+i)))*w);
    }
  }
  /* Setup the shapes made from the sensor values */
  noStroke();                           // no outline
  /* first sweep */
  fill(0,50,0);                         // set the fill colour of the shape (Red, Green, Blue)
  beginShape();                         // start drawing shape
    for (int i = 0; i < 180; i++) {     // for each degree in the array
      x = radius + cos(radians((180+i)))*((oldValue[i])); // create x coordinate
      y = radius + sin(radians((180+i)))*((oldValue[i])); // create y coordinate
      vertex(x, y);                     // plot vertices
    }
  endShape();                           // end shape
  /* second sweep */
  fill(0,110,0);
  beginShape();
    for (int i = 0; i < 180; i++) {
      x = radius + cos(radians((180+i)))*(newValue[i]);
      y = radius + sin(radians((180+i)))*(newValue[i]);
      vertex(x, y);
    }
  endShape();
  /* average */
  fill(0,170,0);
  beginShape();
    for (int i = 0; i < 180; i++) {
      x = radius + cos(radians((180+i)))*((newValue[i]+oldValue[i])/2); // create average
      y = radius + sin(radians((180+i)))*((newValue[i]+oldValue[i])/2);
      vertex(x, y);
    }
  endShape();
  /* if after first 2 sweeps, highlight motion with red circle*/
  if (firstRun >= 360) {
    stroke(150,0,0);
    strokeWeight(1);
    noFill();
      for (int i = 0; i < 180; i++) {
        if (oldValue[i] - newValue[i] > 35 || newValue[i] - oldValue[i] > 35) {
          x = radius + cos(radians((180+i)))*(newValue[i]);
          y = radius + sin(radians((180+i)))*(newValue[i]);
          ellipse(x, y, 10, 10);
        }
      }
  }
  /* set the radar distance rings and out put their values, 50, 100, 150 etc.. */
  for (int i = 0; i <=6; i++){
    noFill();
    strokeWeight(1);
    stroke(0, 255-(30*i), 0);
    ellipse(radius, radius, (100*i), (100*i));
    fill(0, 100, 0);
    noStroke();
    text(Integer.toString(radarDist+50), 380, (305-radarDist), 50, 50);
    radarDist+=50;
  }
  radarDist = 0;
  /* draw the grid lines on the radar every 30 degrees and write their values 180, 210, 240 etc.. */
  for (int i = 0; i <= 6; i++) {
    strokeWeight(1);
    stroke(0, 55, 0);
    line(radius, radius, radius + cos(radians(180+(30*i)))*w, radius + sin(radians(180+(30*i)))*w);
    fill(0, 55, 0);
    noStroke();
    if (180+(30*i) >= 300) {
      text(Integer.toString(180+(30*i)), (radius+10) + cos(radians(180+(30*i)))*(w+10), (radius+10) + sin(radians(180+(30*i)))*(w+10), 25,50);
    } else {
      text(Integer.toString(180+(30*i)), radius + cos(radians(180+(30*i)))*w, radius + sin(radians(180+(30*i)))*w, 60,40);
    }
  }
  /* Write information text and values. */
  noStroke();
  fill(0);
  rect(350,402,800,100);
  fill(0, 100, 0);
  text("Degrees: "+Integer.toString(degree), 100, 380, 100, 50);         // use Integet.toString to convert numeric to string as text() only outputs strings
  text("Distance: "+Integer.toString(value), 100, 400, 100, 50);         // text(string, x, y, width, height)
  text("Radar screen code at luckylarry.co.uk", 540, 380, 250, 50);
  fill(0);
  rect(70,60,150,100);
  fill(0, 100, 0);
  text("Screen Key:", 100, 50, 150, 50);
  fill(0,50,0);
  rect(30,53,10,10);
  text("First sweep", 115, 70, 150, 50);
  fill(0,110,0);
  rect(30,73,10,10);
  text("Second sweep", 115, 90, 150, 50);
  fill(0,170,0);
  rect(30,93,10,10);
  text("Average", 115, 110, 150, 50);
  noFill();
  stroke(150,0,0);
  strokeWeight(1);
  ellipse(29, 113, 10, 10);
  fill(150,0,0);
  text("Motion", 115, 130, 150, 50);
}

/* get values from serial port */
void serialEvent (Serial myPort) {
  String xString = myPort.readStringUntil('n');  // read the serial port until a new line
    if (xString != null) {  // if theres data in between the new lines
        xString = trim(xString); // get rid of any whitespace just in case
        String getX = xString.substring(1, xString.indexOf("V")); // get the value of the servo position
        String getV = xString.substring(xString.indexOf("V")+1, xString.length()); // get the value of the sensor reading
        degree = Integer.parseInt(getX); // set the values to variables
        value = Integer.parseInt(getV);
        oldValue[degree] = newValue[degree]; // store the values in the arrays.
        newValue[degree] = value;
        /* sets a counter to allow for the first 2 sweeps of the servo */
        firstRun++;
        if (firstRun > 360) {
          firstRun = 360; // keep the value at 360
        }
  }
}
The end result
Here’s a video below of it all working! There is an issue to bare in mind with the SRF-05 and thats that it works best as a static range finder, it emits a conical wave which will bounce back off of anything small or large and has a wide detection field of vision so it may pick up something that’s not directly in front of it. As you can see by the below image the detection range is so wide that it doesn’t truly see all the gaps as its detected something else in its field of vision.
Here’s a video below of it all working! There is an issue to bare in mind with the SRF-05 and thats that it works best as a static range finder, it emits a conical wave which will bounce back off of anything small or large and has a wide detection field of vision so it may pick up something that’s not directly in front of it. As you can see by the below image the detection range is so wide that it doesn’t truly see all the gaps as its detected something else in its field of vision.
If there are less objects it works fine… time to look at other sensors I think – anyway here’s the video below just showing it working on my screen.
So I had some luck with getting the Sharp Infrared range finder working and I’ve now plugged this on to my servo rig to see if I get better results on my radar styled display.
Few things to bare in mind, whilst the code is pretty much the same there are a few subtle differences. Firstly for better readings the Arduino code has a longer delay – but since we’re not allowing for a sonar ping there’s not much noticeable difference.
Next we’re expecting integer values in the processing code so when sending values to over the serial port we cast them from float to integer.
Because the IR sensor has a different range I’ve altered the display to measure only up to 150cm. And becasue of this range limitation, if there is any value recorded outside of this range then we need to handle it to avoid seeing spikes and the same for any value under 20cm we need to also handle this.
To make the display more readable I keep the same size screen and area (radius of 300) and then multiply the sensor values by 2 to magnify them a bit more.
Other than it, it’s basically the same code as before and when we look at the image comparison now between what the sensor records and what is physically there we see a far better match, in some cases it’s a little to accurate.
Arduino sketch
Processing sketch
Hiç yorum yok:
Yorum Gönder