 |
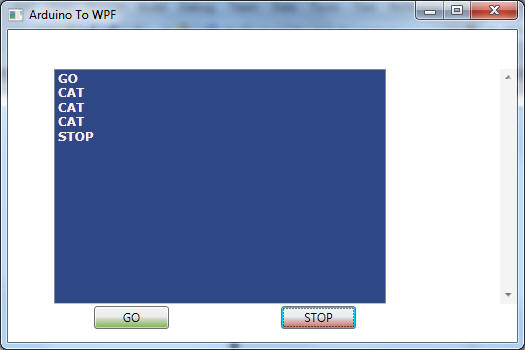 |
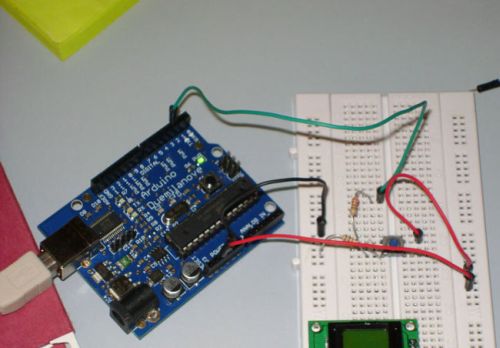
Figure 1 - WPF App and Arduino Board Application Side-by-Side
Introduction
The open source movement has changed the landscape of the software world. If you look hard enough, you can find solutions to software issues without spending a lot of money as long as you use the software in adherance with the GPL or other legal open source licenses that apply. On the edge of the wave of open source software projects, comes a new trend: open-source hardware. The Arduino microcontroller board which includes a PIC microcontroller is just such a beast. The schematics, autocad files, and programming software all fall under the open source license. Anyone can build an Arduino board, anyone can download the Arduino schematics, and anyone can download the Arduino software to program the board. Projects for the Arduino board have taken off like no other microcontroller board. I bought my Arduino controller on Ebay and it was shipped to me from Hong Kong. The total cost for the board was $35, a far cry from private companies selling the same kind of product.
Hooking up the Board
After receiving the Arduino Board from overseas and downloading the Arduino software for windows, I plugged the board into my computer with to the USB connector that came with my board. I compiled, BLINK, one of the sample applications that came with the board. It compiled fine, but when I tried to upload it to the board via USB, I got an error. It turned out that I had to change the settings on the Arduino Software from communicating on COM1 to communicating on COM3. After making that adjustment, the board worked like a charm. The LED on the board started blinking incessantly. I was ready to start talking to a .NET application.
Application Design
I wanted to create a simple application that would allow my PC to communicate to the Arduino board and vice-a-versa; It would also have the Arduino board write back to .NET. The application would do the following: Upon pushing the GO button in my PC window, it would signal the Arduino to start sending data. I added a push button on the Arduino circuit so that when it was pushed, it would release the data. In this case it the Arduino would just keep sending the word CAT over and over again, until the user let go of the push button. Hitting Stop would signal the Arduino to stop sending data, regardless of pressing the pushbutton in the future. The state diagram for this program is illustrated in the window in figure 2.
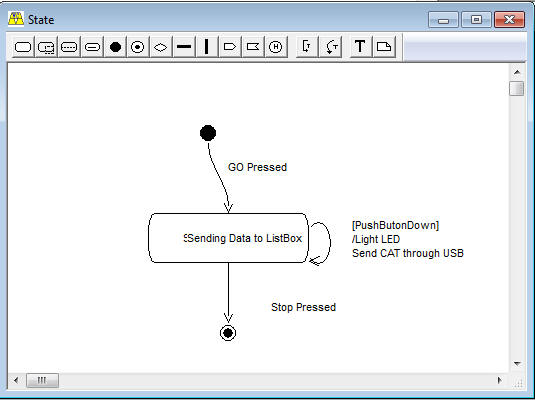
Figure 2 -State Diagram of Arduino - .NET Communication in WithClass
.NET Application
The .NET app is a fairly straightforward WPF application with a GO and STOP button to signal the Arduino and a Listbox for displaying data from the Arduino. The application uses the serial port component included with the .NET framework. In listing 1, we set up the serial port in the constructor to match the serial port settings on the Arduino. We also hook up the event handler for receiving data from the Arduino and also sending data to the Arduino. When the user hits the GO button, it kicks off the StartConnectionToArduino method. This method writes a capial A character to the serial port, which is read by the Arduino board to signal it to start sending data. When the Arduino sends character data to the .NET application, it picks it up in the _port_DataReceived event handler. The event handler puts the data on the UI thread and splits out the data according to linefeeds. Each item terminated by a line feed is added to the Items collection in the ViewModel bound to the listbox.
Listing 1 - C# Code for Excercising the Arduino Board
using System;
using System.ComponentModel;
using System.IO.Ports;
using System.Linq;
using System.Windows;
namespace WPFToArduino
{
/// <summary>
/// Interaction logic for MainWindow.xaml
/// </summary>
///
///
public partial class MainWindow : Window
{
private readonly SerialPort _port;
private string _lastData = "";
private bool _stopped = false;
public MainWindow()
{
InitializeComponent();
DataContext = new SerialDataViewModel();
SerialDataViewModel = DataContext as SerialDataViewModel;
// Set up the serial port communication with the Arduino on COM3 at 9600 baud
// Set up the serial port communication with the Arduino on COM3 at 9600 baud
_port = new SerialPort("COM3") {BaudRate = 9600};
// hook up the event for receiving the data
// hook up the event for receiving the data
_port.DataReceived += _port_DataReceived;
_port.Open();
}
public SerialDataViewModel SerialDataViewModel { get; set; }
private void StartConnectionToArduino()
{
// Signal the Arduino Board to start sending data
// Signal the Arduino Board to start sending data
_port.Write("A");
}
private void EndConnectionToArduino()
{
// Signal the Arduino Board to stop sending data
// Signal the Arduino Board to stop sending data
_port.Write("B");
}
private void _port_DataReceived(object sender, SerialDataReceivedEventArgs e)
{
if (_stopped) return;
// Send data received from the Arduino to the Listbox on the UI thread
Application.Current.Dispatcher.BeginInvoke((Action) (() =>
{
string data = _port.ReadExisting();
_lastData += data;
string[] allData = _lastData.Split('\n');
_lastData = allData[allData.Length - 1];
foreach (var word in allData.Take(allData.Length - 1))
{
SerialDataViewModel.Items.Add(word);
}
}));
}
private void OnGoButtonClicked(object sender, RoutedEventArgs e)
{
StartConnectionToArduino();
}
private void StopButton_Click(object sender, RoutedEventArgs e)
{
EndConnectionToArduino();
}
private void Window_Closing(object sender, CancelEventArgs e)
{
_stopped = true;
_port.Close();
}
}
The Arduino Code
The Arduino code is written in a C like language and is extremely straightforward. If you know C#, then getting a handle on programming the Arduino is a no-brainer. Unlike C of yonder years ago, the Arduino library uses full english words in there functions and class types. Listing 2 shows the Arduino code for implementing the state diagram in Figure 2.
There are two must have functions for all arduino programs. There is a setup method where you put all your initialization code and there is aloop method that continues to execute your code in a loop. The loop method acts like the engine driving the state machine we put inside the loop. Our loop method will do several things. First it will read the state of the push button to see if it was pressed. Next it will read the next byte of serial data. If an 'A' was sent, then we will tell the arduino to set a flag to start reading input. if a 'B' was sent, we'll tell the Arduino to set a flag to stop reading input. If the push button was pressed and the input reading flag is set, then we'll write CAT to the serial port. We'll signal that something was written by turning the LED on.
Listing 2 - Arduino Code used to program the Arduino Board
int buttonState = 0;
int inByte = 0; // incoming serial byte
boolean isReadingData = 0; // kick off loop
const int ledPin = 13; // the number of the LED pin
const int buttonPin = 2; // the button pin
void setup()
{
// start serial port at 9600 bps:
Serial.begin(9600);
pinMode(buttonPin, INPUT); // digital sensor is on digital pin 2
pinMode(ledPin, OUTPUT);
}
void loop()
{
// read the input state of the pushbutton
buttonState = digitalRead(buttonPin);
// read the USB input
inByte = Serial.read(); // read a character coming from the serial port
if (inByte == 'A')
{
Serial.print('G', BYTE); // write GO to the serial port
Serial.print('O', BYTE);
Serial.print('\n', BYTE);
isReadingData = true;
}
if (inByte == 'B')
{
Serial.print('S', BYTE); // write STOP to the serial port
Serial.print('T', BYTE);
Serial.print('O', BYTE); Serial.print('P', BYTE);
Serial.print('\n', BYTE);
isReadingData = false;
}
if (isReadingData && buttonState == HIGH)
{
Serial.print('C', BYTE); // write CAT to the serial port
Serial.print('A', BYTE);
Serial.print('T', BYTE); Serial.print('\n', BYTE);
digitalWrite(ledPin, HIGH); // turn on the led
delay(1000); // wait 1 second
digitalWrite(ledPin, LOW); // turn off the led
}
}
The pushbutton and LED Circuit is shown in figure 3. The project utilizes pin 2 and pin 13 on the Arduino board. In our program we set up pin 2 as an input so it could accept input from the pushbutton state. Pin 13 is set up as an output pin to light the LED. On the board I got from ebay, the LED is built into the Arduino board for pin 13 so I didn't have to do any wiring myself. If you do want to light your own LED, you should protect it with a resistor. An LED requires about 20-25 ma and has about a 2V drop across it. Using ohms law to calculate the resistor:
Vss - V(LED)/ 20 ma = (5 - 2)/.02 = 150 ohms
The pushbutton requires a pull-down circuit to prevent false high values. In other words, when we release the pushbutton, we want it quickly pulled the voltage down to ground, so we place a 10k resistor from the pushbutton to the ground connection to make this happen.
Figure 3 - Arduino Circuit for .NET Project
Conclusion
The Arduino opens up a whole world of electronic experimentation for a reasonable amount of money. There are also parts called shields sold for the Arduino to enable GPS, WI FI, and much more. If you are curious about the power of the Arduino microcontroller, visit the Arduino website and take a look around. You may come up with an idea for a cool invention and PIC a winner using the Arduino, C# and .NET.
Hiç yorum yok:
Yorum Gönder